• Deutsch
  • English
  • Français

Cane Pruning

Cane Pruning ('long' pruning) - also known as "arched cane pruning" or the Guyot Method - with 8-12 eyes on the canes, is commonly used in vineyards and occasionally used on grapevines grown along house façades. With this method, vigorous grapevine varieties can be 'tamed,' gaps in the main framework bridged, and very high fruit yields achieved. Here we illustrate this technique for fully trained vines. Please also refer to the information under Training in the 1st to 3rd years!

The diagrams below illustrate the pruning technique over several years based on a single "side shoot" arising from the stem. Other side shoot positions have already been established on the stem framework, usually about 40-80 cm apart, which may be spur or rod pruned. The new side shoot position shown in the following diagrams is developed from one shoot, which was well-planned during the vine training. When rejuvenating an older vine, the same procedure can be applied to a water shoot which has arisen from the main trunk, to form a new side shoot. 


Cane pruning is divided into 3 steps: pre-pruning, fruit cane pruning, and bending/tying. These steps can be carried out immediately one after the other or in stages over a few days or weeks. For vines growing along the house, we recommend the following: all side shoot positions (branches) of the vine are first pruned so that the bulk of the wood is removed and the vine becomes manageable. This also facilitates the pruning of the fruit canes and counting of the 10-20 buds per square metre of wall space. 


The diagrams in the column to the left show the side shoot after leaf fall in winter, and the pre-pruning into the old wood (dark brown). The vine was pruned in summer; otherwise, the shoots would be much longer now. Each cane produced an average of 1-2 grape bunches in summer. The diagrams in the centre illustrate the fruit cane pruning into previous year's wood (ochre), and the diagrams on the right side show the results. The additional required bending/tying is described separately.

Two side shoot positions arising from a vine with "arched cane and replacement spur," bud burst in spring.
Circular pruning of grapevines
Diagram 00: Young vine in fan form; the framed area is illustrated in all following diagrams.
Pruning sketch

Beginning of the 4th Year

Diagram 01: A new, well lignified side shoot in a young vine (Diagram 00) or a water shoot on an older vine
Diagram 02: First the cane is spur pruned to ensure vigorous bud burst and growth of the future canes.
Diagram 03: Formed spur

Beginning of the 5th Year

Diagram 04: No pre-pruning now, because both shoots of the spur will be used: the upper cane will be the fruiting cane in the upcoming season; the lower one the replacement or future spur.
Diagram 05: The upper cane is pruned to a long fruiting cane, the lower one to a spur. The spur must always be closer to the stem than the fruiting cane, to ensure that the side shoot position remains close to the stem over the years.
Diagram 06: Pruning completed on side shoot, with an arched cane and a replacement spur

Beginning of the 6th Year

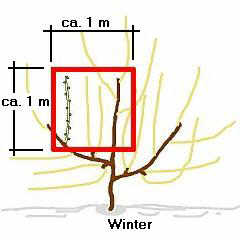
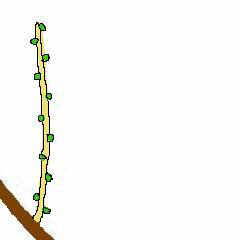
Diagram 07: (refer also to Image 01 above.) All shoots of the arched cane ideally produced 1-2 grape bunches in summer and are now worn out. In the pre-pruning, the entire arched cane with all its shoots is removed. Often the two shoots growing from the replacement spur are so vigorous that they can keep the fruit produced in summer; otherwise, the grapes will have been removed at the beginning of summer.
Diagram 08: Forming of the new arched cane for next season (fruit cane pruning) and the replacement spur for the season after next. The replacement spur must always be closer to the stem than the fruiting cane (which will be removed in winter).
Diagram 09: Pruning completed on side shoot, with an arched cane and a replacement spur; this time the fruit cane is already in an approximately horizontal position, hence only tying (and no bending) is necessary.

Beginning of the 7th Year

Diagram 10: Many or all shoots on the arched cane produced grapes again and are worn out; the entire arched cane with all its shoots is removed.
Diagram 11: Forming of the new arched cane for the upcoming season, and the replacement spur for the season after next; again, the replacement spur must be closer to the stem than the fruiting cane.
Diagram 12: Pruning completed on side shoot, with an arched cane and a replacement spur; this time, the fruiting cane was in a rather awkward position and had to be shaped and tied into the desired position by carefully twisting and "massaging" it.

Beginning of the 8th Year

Diagram 13: Again, many or all shoots arising from the arched cane produced grapes again and are now worn out... the entire arch including its shoots is removed (pre-pruning).
Diagram 14: Forming of the new arched cane for next season and the replacement spur for the season after that; again, it is important that the replacement spur is closer to the stem than the fruiting cane.
Diagram 15: Pruning completed on side shoot, with arched fruiting cane and replacement spur